Building a refund tool
- TypeScript
- JavaScript
Ready to dive in and try Interval for yourself? In this tutorial, you'll learn the ins and outs of Interval through building, deploying and refining an app to handle refunds.
The specifics of the app we're building aren't important. By the end of this tutorial, you'll be familiar with Interval's core concepts and you'll be able to use it to quickly build internal apps that your team will love.
Prerequisites
When building apps with Interval, you'll need Node.js version 14 or greater. For this tutorial, we're going to be building a tool that interacts with Stripe's Node.js SDK. If you don't have a Stripe account and just want to learn Interval, no problem. We've built a fake-stripe Node module that you can use in place of Stripe's SDK for this tutorial.
When building apps with Interval, you'll need Node.js version 14 or greater. For this tutorial, we're going to be building a tool that interacts with Stripe's Node.js SDK. If you don't have a Stripe account and just want to learn Interval, no problem. We've built a fake-stripe Node module that you can use in place of Stripe's SDK for this tutorial.
info
Want to add Interval to an existing app? For this tutorial, we're building in a new codebase. In the real world, you'll likely want to add Interval to an existing codebase. Doing so will let you share code and secrets between your internal tools and your user-facing app. Learn more
Running Interval Server
Before we begin, you'll need to be running an instance of Interval Server. Follow the instructions in the Interval Server documentation to get started.
Getting an API key
Before we can run our app, we'll need to specify an Interval API key. Specifying a key links our local project to our Interval dashboard.
In Interval, there are two kinds of API keys:
- A personal development key starts your app in the Development environment, where only you can access your app.
- A Live mode key starts your app in the Production environment, where everyone on your team can access your app.
Since we're developing our app, we're going to use a personal development key.
To access your personal development key, visit the Keys page of your Interval dashboard.

From this page, you can copy your personal development key.
In your .env file, paste the key you copied from the Interval dashboard as the value for INTERVAL_KEY:
INTERVAL_KEY=<your_name_dev_xxx...>
Our project is pre-configured to read the values from the .env file into process.env via the popular dotenv package.
In your .env file, paste the key you copied from the Interval dashboard as the value for INTERVAL_KEY:
INTERVAL_KEY=<your_name_dev_xxx...>
Our project is pre-configured to read the values from the .env file into process.env via the popular dotenv package.
With our API key set, we're now ready to begin building our app.
The minimal Interval app
Inside of our index.ts, we first need to import Interval and dotenv. Next, we'll create an instance of the Interval class and define our first action, the starting point for our refund_user tool.
import path from "path";
import { Interval } from "@interval/sdk";
import "dotenv/config"; // loads environment variables from .env

const interval = new Interval({
  endpoint: "wss://<YOUR INTERVAL SERVER URL>/websocket",
  apiKey: process.env.INTERVAL_KEY,
  routesDirectory: path.resolve(__dirname, "routes"),
});

// Establishes a persistent connection between Interval and your app.
interval.listen();
Next, we'll create our refund_user action.
import { Action } from "@interval/sdk";

export default new Action(async () => {
  // TODO
});
As you might have inferred from the code above, Interval actions are async functions. Importantly, the primary source of truth for actions is the code you write. We can now see our resulting app by running:
- npm
- yarn
npm run dev
yarn dev
Inside of our index.ts, we first need to import Interval and dotenv. Next, we'll create an instance of the Interval class and define our first action, the starting point for our refund_user tool.
const path = require("path");
const { Interval } = require("@interval/sdk");
require("dotenv").config(); // loads environment variables from .env

const interval = new Interval({
  endpoint: "wss://<YOUR INTERVAL SERVER URL>/websocket",
  apiKey: process.env.INTERVAL_KEY,
  routesDirectory: path.resolve(__dirname, "routes"),
});

// Establishes a persistent connection between Interval and your app.
interval.listen();
Next, we'll create our refund_user action.
const { Action } = require("@interval/sdk");

module.exports = new Action(async () => {
  // TODO
});
As you might have inferred from the code above, Interval actions are async functions. Importantly, the primary source of truth for actions is the code you write. We can now see our resulting app by running:
- npm
- yarn
npm run dev
yarn dev
You should see a message like this in your terminal:
[Interval] 🔗 Connected! Access your actions at: https://interval.com/<your_org>/develop
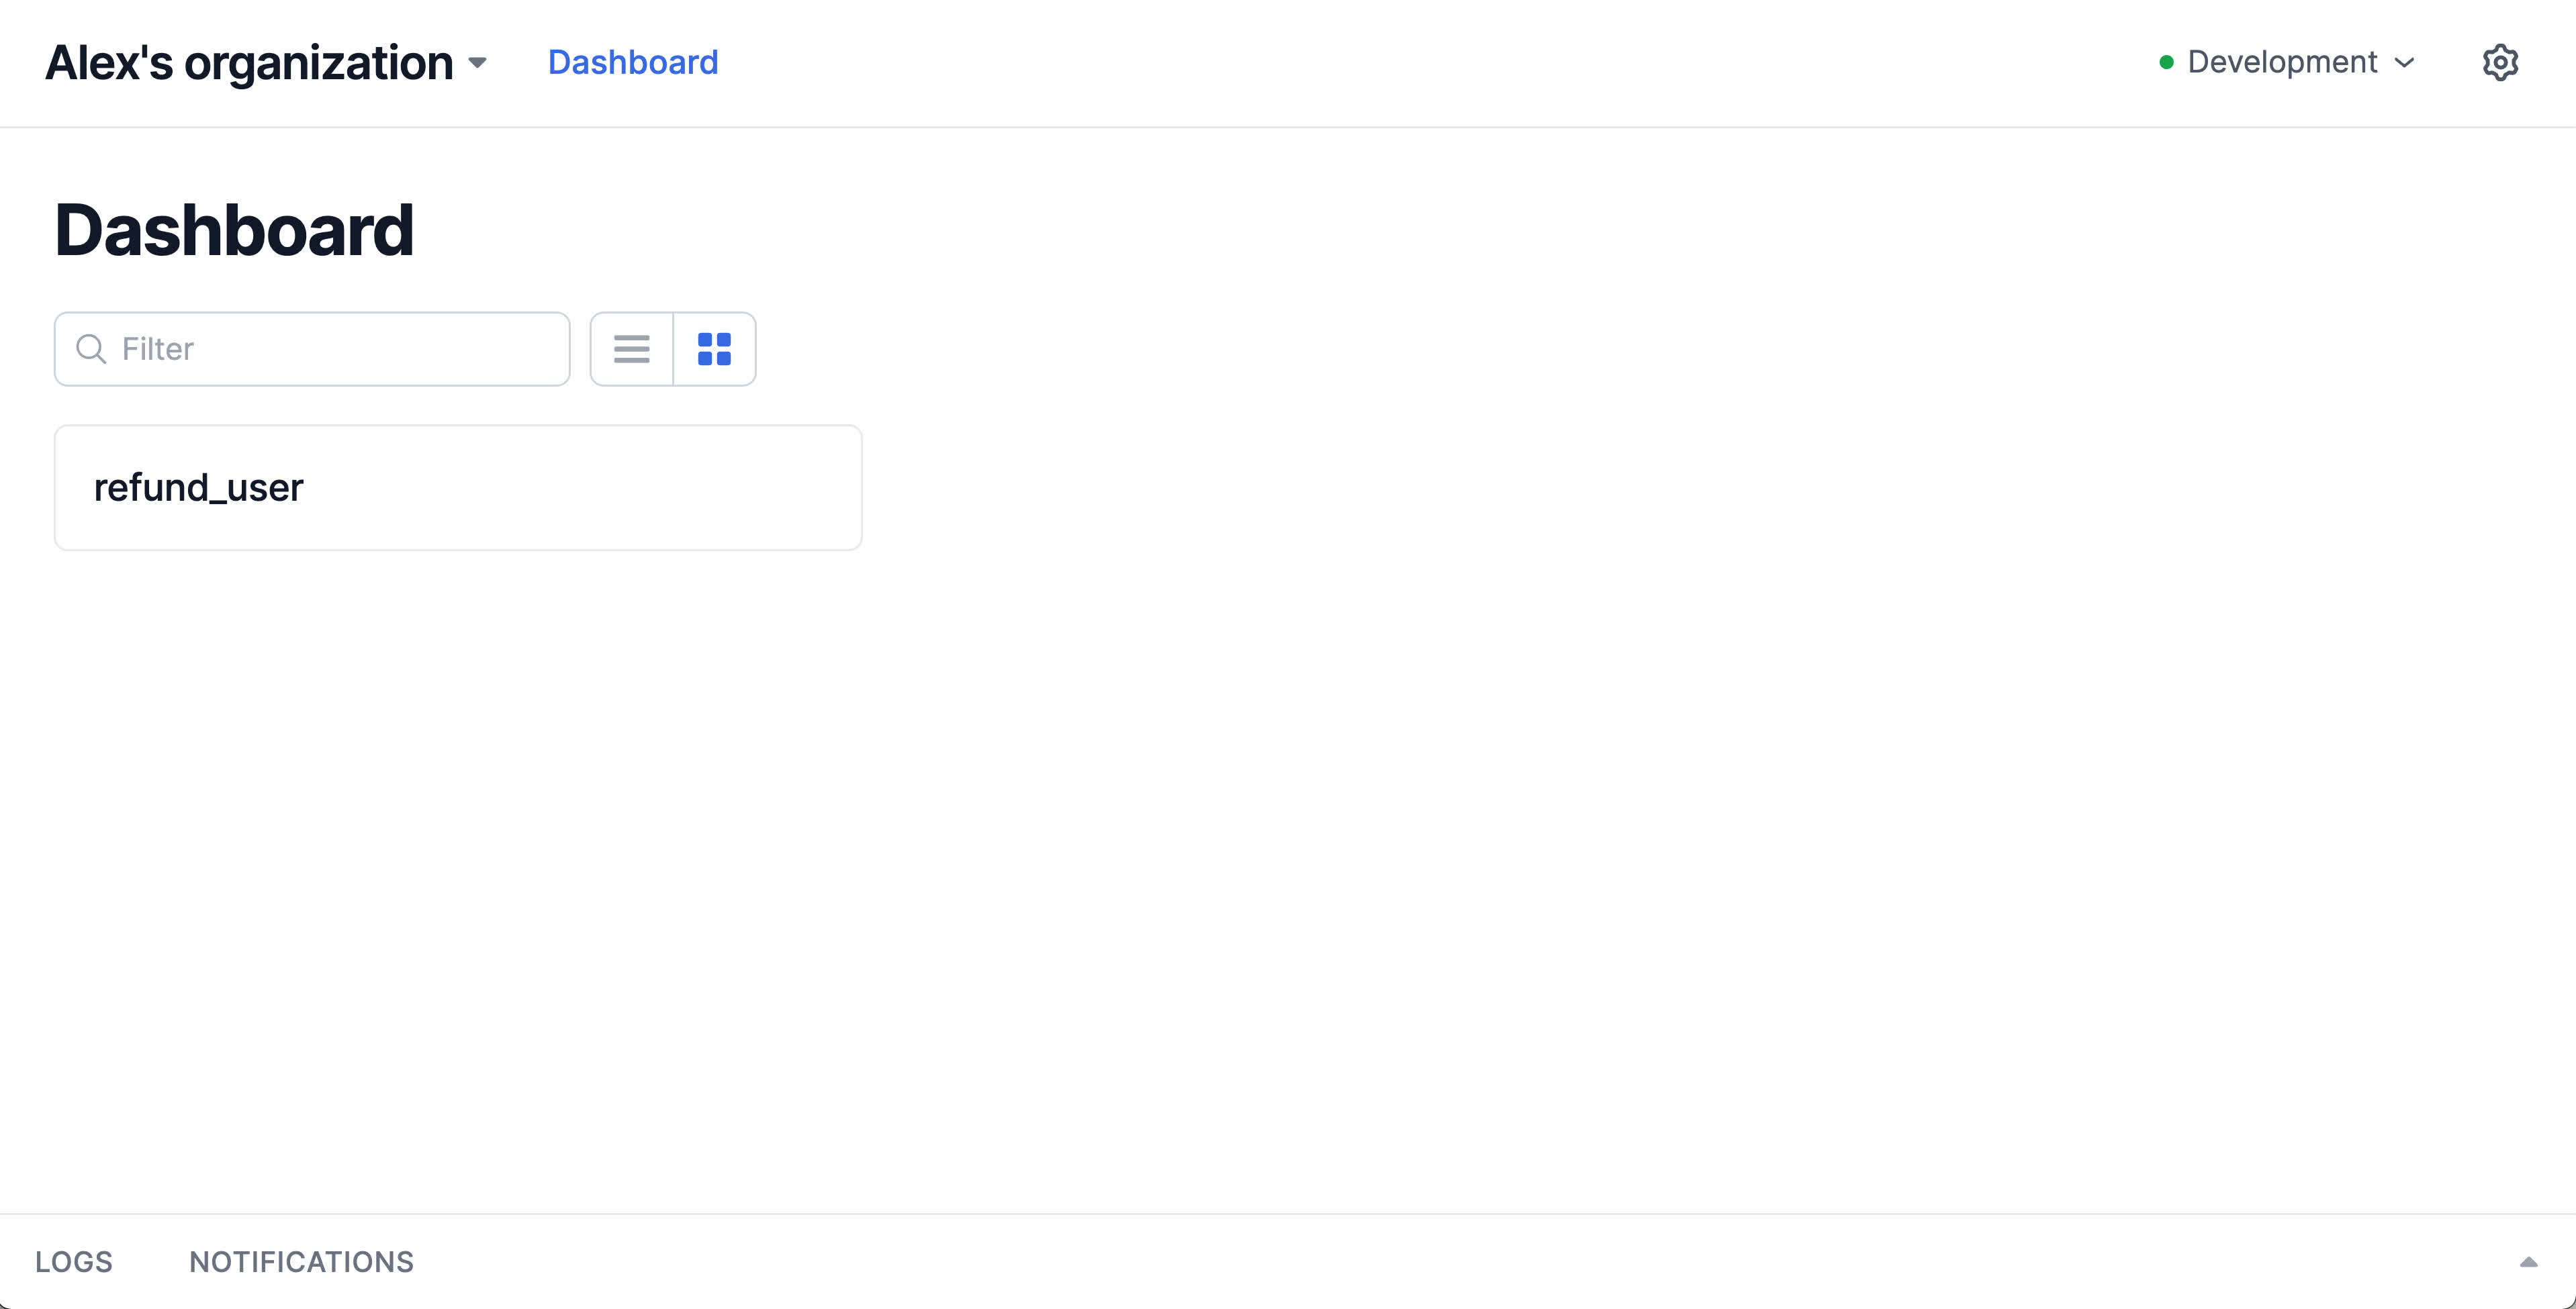
If you visit this URL, you'll see something like this:

When you click refund_user Interval will send a message back to your codebase and tell it to execute the function corresponding to the refund_user slug. It's important to note that the function execution is happening fully on your machine, in your runtime. This highlights a critical security and privacy component of Interval's design: Interval can never see your code or your secrets.
Of course, the refund_user function we defined doesn't do much. If you run it, it will print "Hello, world!" in your terminal and return. In the next section, we'll start building out the logic of this action.
Getting the email of the user to refund
The first step in refunding a user is looking up the user to refund. We're going to do this by email, so we'll need to prompt the runner of our action to enter the user's email. To collect input and display output in Interval, we use I/O methods. These methods can only be called within actions.
Once we've added io to our Interval import, to collect the user's email, we'll replace our log statement with a call to io.input.email. Now, our refund_user.ts file should read:
import { Action, io } from "@interval/sdk";

export default new Action(async () => {
  const customerEmail = await io.input.email(
    "Email of the customer to refund:"
  );
  console.log("Email:", customerEmail);
});
Once we've added io to our Interval import, to collect the user's email, we'll replace our log statement with a call to io.input.email. Now, our refund_user.ts file should read:
const { Action, io } = require("@interval/sdk");

module.exports = new Action(async () => {
  const customerEmail = await io.input.email(
    "Email of the customer to refund:"
  );
  console.log("Email:", customerEmail);
});
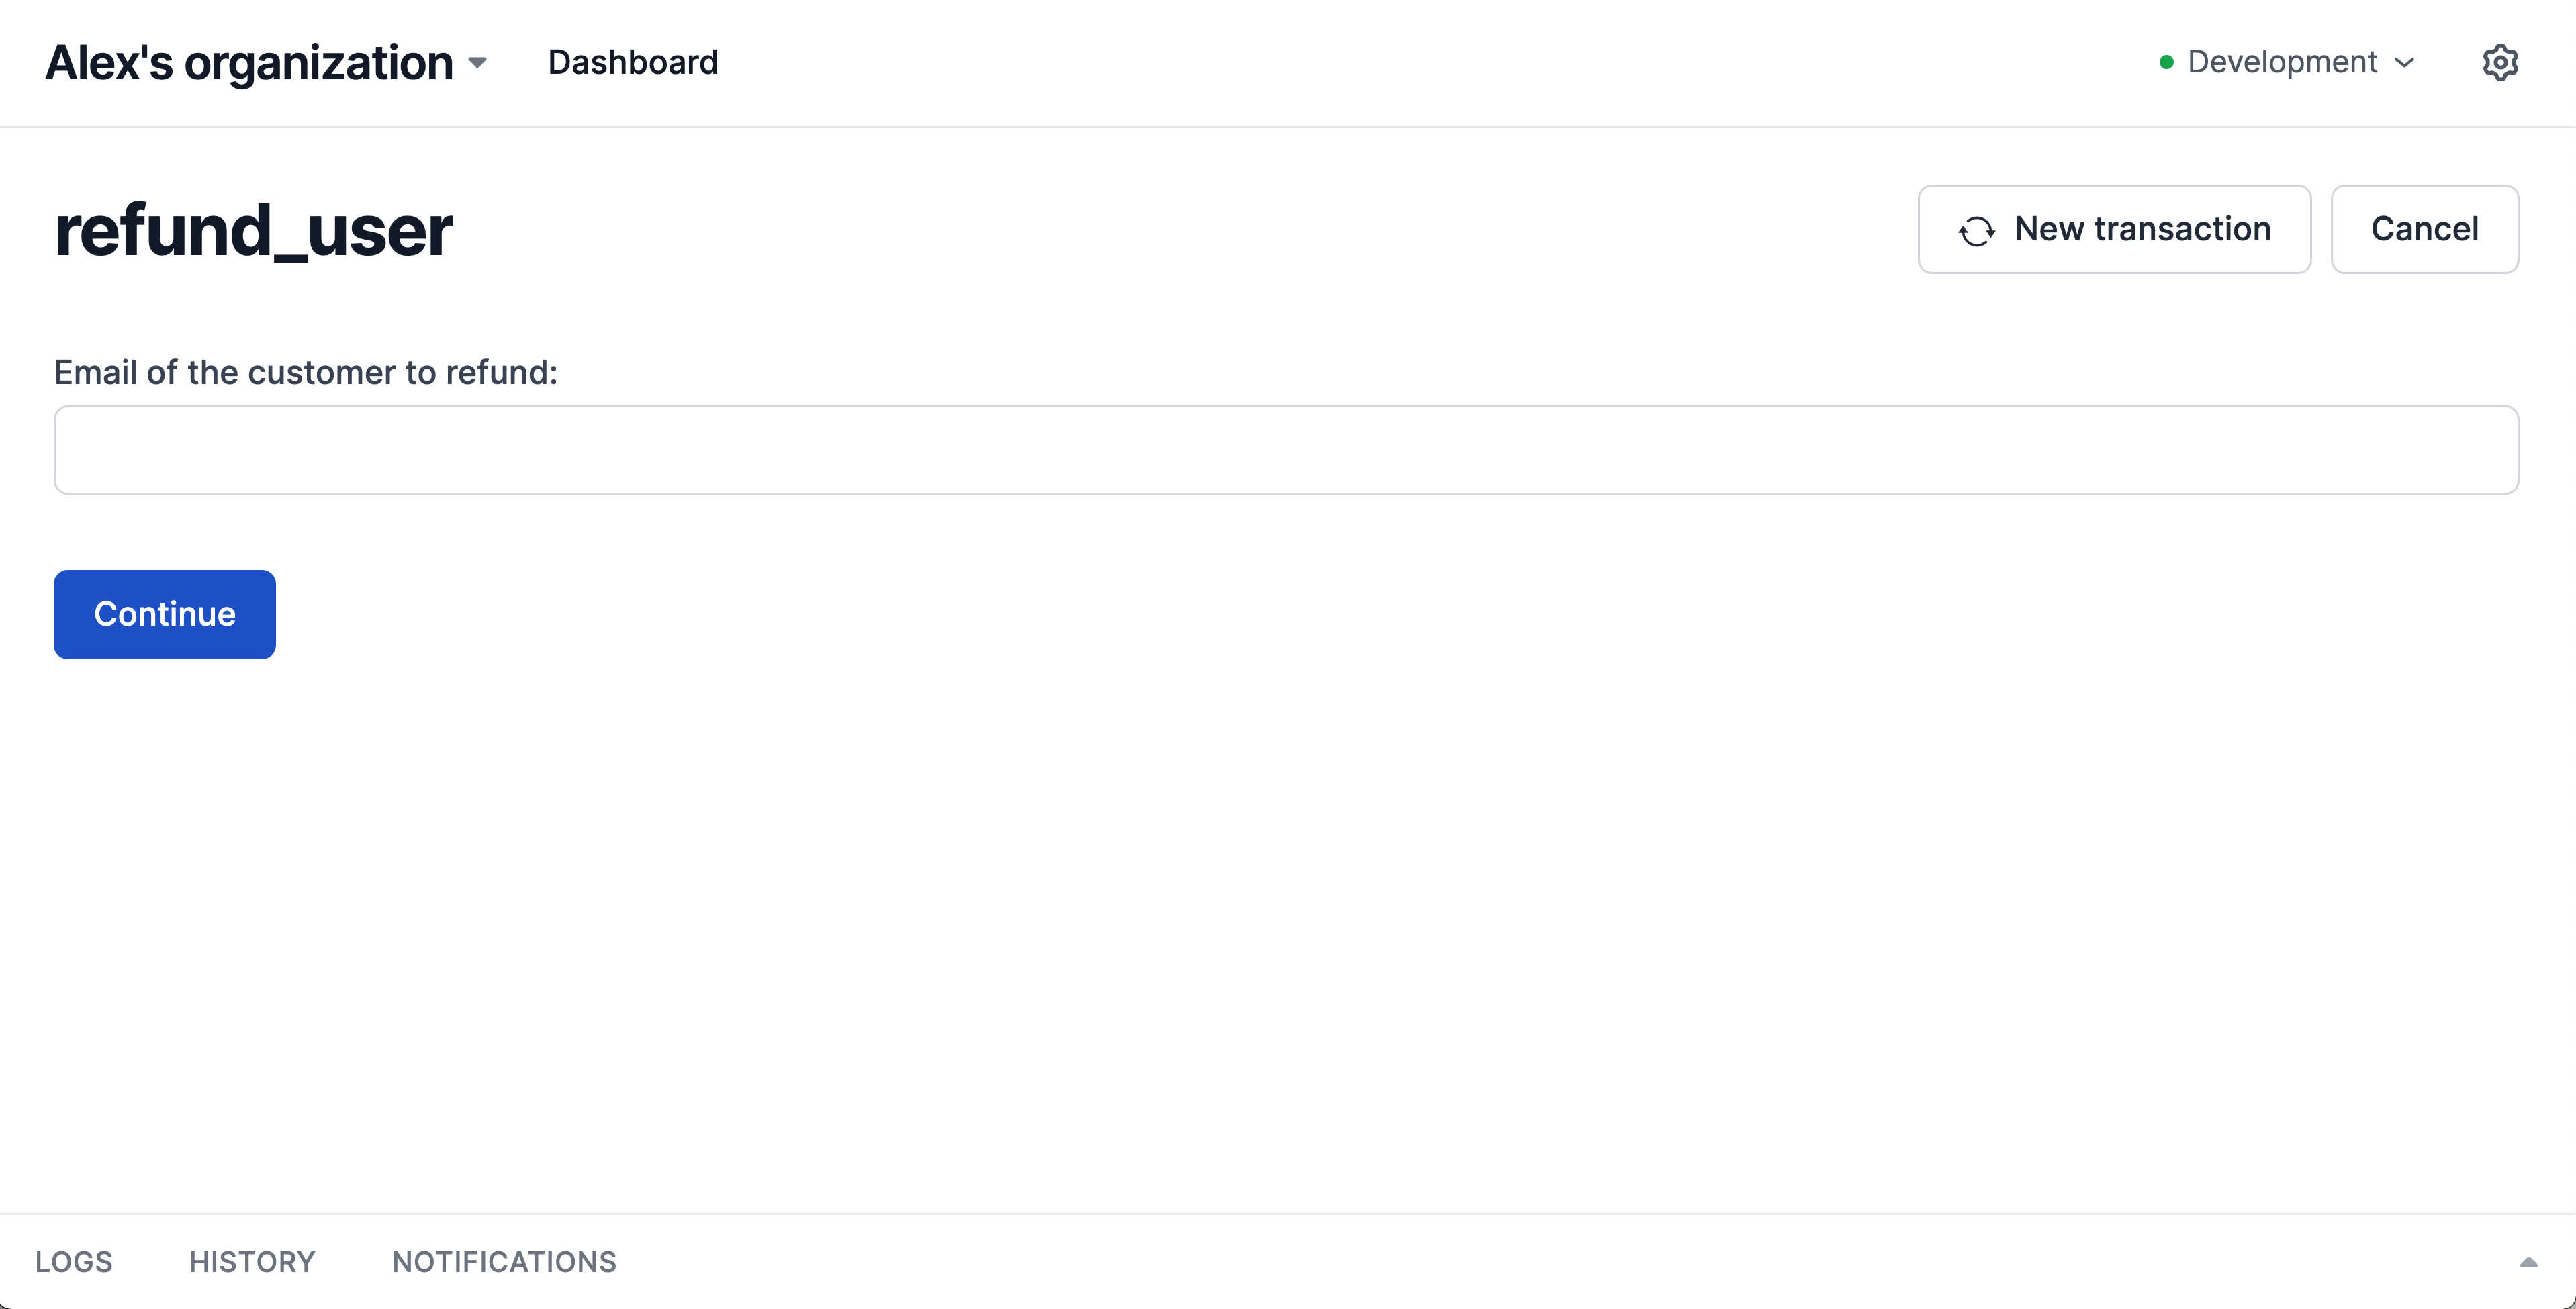
What's happening here? When the io.input.email method is called, the Interval SDK will send a message back to Interval with instructions to collect an email address from the runner of the action. Interval interprets that message and renders an email input in the browser with the label we defined in our action:

Because we're using async/await, while the person running the action is entering the email address of the customer to refund, our action won't continue executing but it also won't block the main thread of our app.
When an email has been entered and the "Continue" button is pressed, Interval sends a message back to our codebase with the value. Before it gets returned to our action handler function as the customerEmail variable, the Interval SDK will do the heavy lifting of parsing, type-checking, sanitizing and validating the value. When we access customerEmail in the next line of code, it is a soundly typed string variable with an added assurance from the Interval SDK that the variable holds a valid email address.
When an email has been entered and the "Continue" button is pressed, Interval sends a message back to our codebase with the value. Before it gets returned to our action handler function as the customerEmail variable, the Interval SDK will do the heavy lifting of parsing, type-checking, sanitizing and validating the value. When we access customerEmail in the next line of code, it is a soundly typed string variable with an added assurance from the Interval SDK that the variable holds a valid email address.
🤯 With just one line of code, we've rendered a web UI with an email input and returned the sanitized and type-checked value of that input field to our Node app.
Choosing the charges to refund
Now that we have the email for our customer, we'll next need to get a list of their charges so that we can allow the person running our action to choose which ones should be refunded. To do this, we're going to use the Stripe SDK. Our payments.ts file is configured by default to use our fake version of the Stripe SDK which doesn't require a real Stripe API key.
tip
If you want to use the real Stripe SDK, just replace the Stripe import in your payments.ts file and provide a STRIPE_KEY in your .env file.
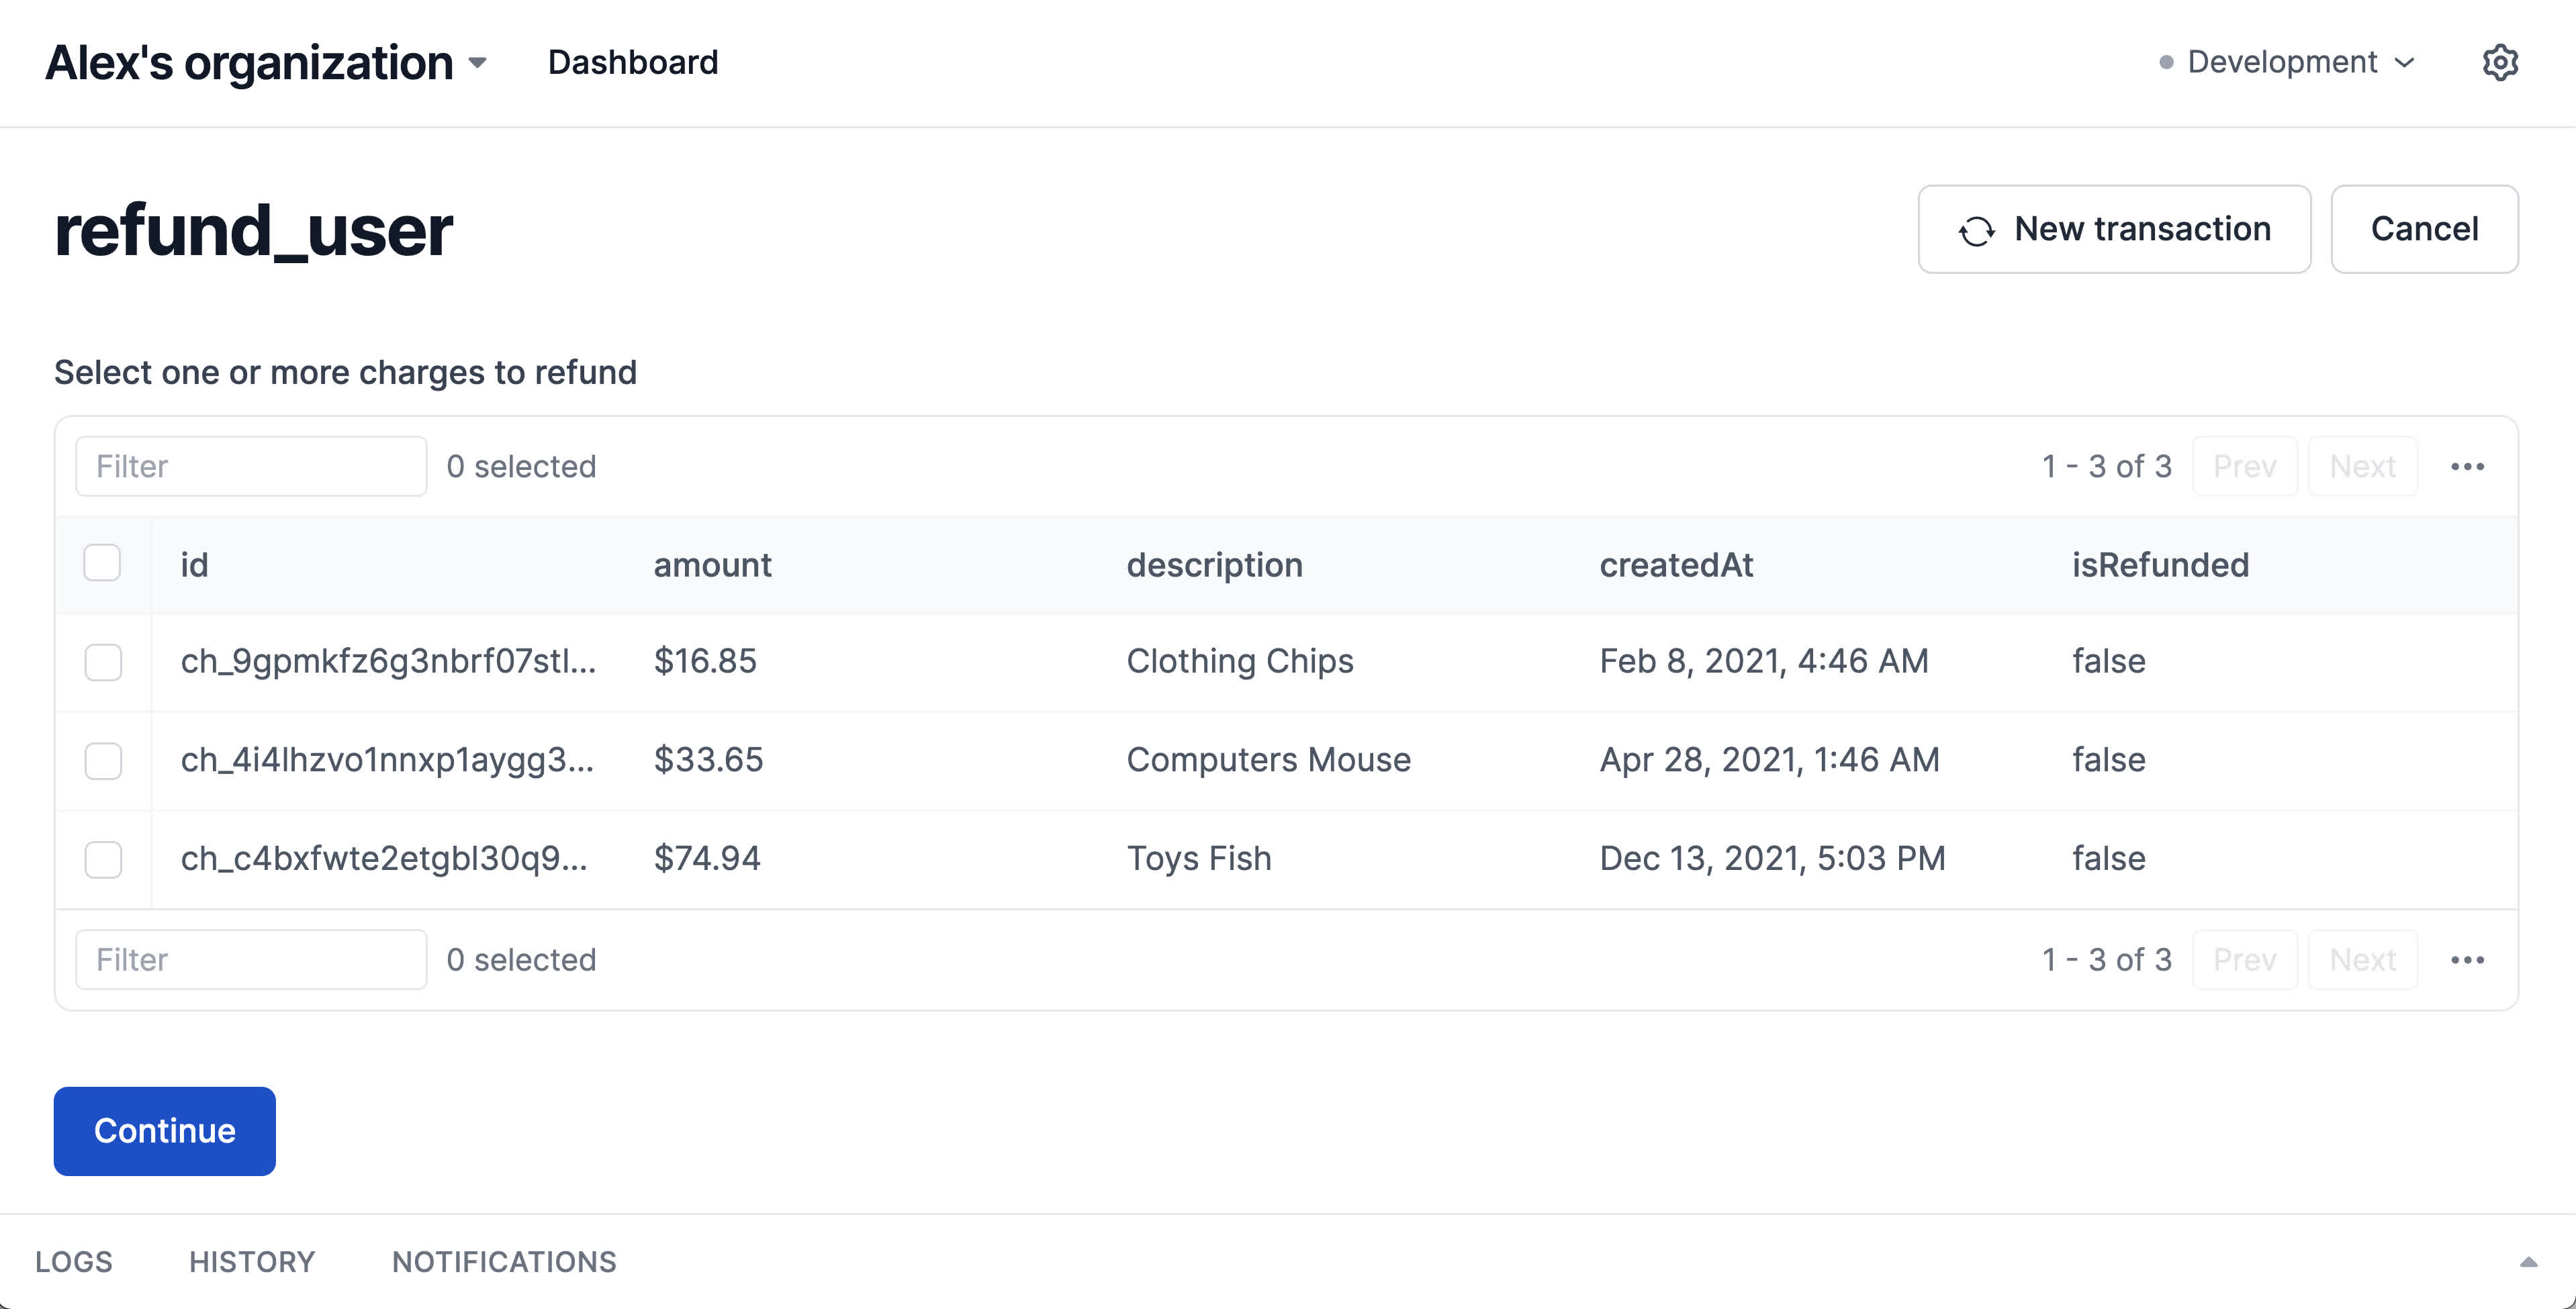
The payments.ts file exports a helper method called getCharges which we'll add to our imports. In the refund_user.ts file we'll call the getCharges function and pass the resulting array to an io.select.table, which will display a list of charges that the runner of our action can select from:
import { Action, io } from "@interval/sdk";
import { getCharges } from "./payments";

export default new Action(async () => {
  const customerEmail = await io.input.email(
    "Email of the customer to refund:"
  );
  console.log("Email:", customerEmail);

  const charges = await getCharges(customerEmail);

  const chargesToRefund = await io.select.table(
    "Select one or more charges to refund",
    {
      data: charges,
    }
  );
});
By this point, you may have noticed that the first argument for all I/O methods is a string which will serve as the label for the UI element rendered by Interval. Note also that the chargesToRefund variable is a subset of the array we passed into the I/O method through the data parameter.
Now that we have the email for our customer, we'll next need to get a list of their charges so that we can allow the person running our action to choose which ones should be refunded. To do this, we're going to use the Stripe SDK. Our payments.ts file is configured by default to use our fake version of the Stripe SDK which doesn't require a real Stripe API key.
tip
If you want to use the real Stripe SDK, just replace the Stripe import in your payments.ts file and provide a STRIPE_KEY in your .env file.
The payments.ts file exports a helper method called getCharges which we'll add to our imports. In the refund_user.ts file we'll call the getCharges function and pass the resulting array to an io.select.table, which will display a list of charges that the runner of our action can select from:
const { Action, io } = require("@interval/sdk");
const { getCharges } = require("./payments");

module.exports = new Action(async () => {
  const customerEmail = await io.input.email(
    "Email of the customer to refund:"
  );
  console.log("Email:", customerEmail);

  const charges = await getCharges(customerEmail);

  const chargesToRefund = await io.select.table(
    "Select one or more charges to refund",
    {
      data: charges,
    }
  );
});
By this point, you may have noticed that the first argument for all I/O methods is a string which will serve as the label for the UI element rendered by Interval. Note also that the chargesToRefund variable is a subset of the array we passed into the I/O method through the data parameter.
Now is a good time to check in and see the UI generated by Interval. If we refresh our browser and run our action, we should now see a UI like this to choose which charges to refund:

Issuing the refunds
With our list of chargesToRefund, now all that's left to do is issue the refunds. To let us refund the charge, we'll import the refundCharge helper function from the payments.ts file.
With our list of chargesToRefund, now all that's left to do is issue the refunds. To let us refund the charge, we'll import the refundCharge helper function from the payments.ts file.
Because in production we'll communicate with Stripe over the network, requests to their APIs can take some time to complete. Rather than leaving the people running our action in an unknown state, we can easily show them our progress issues the refunds using Interval's loading APIs.
The loading methods exist on Interval's ctx (short for "context") APIs. Just like I/O methods, the ctx object can only be accessed from within actions. To use these methods, we'll add the ctx object to our Interval SDK import.
In our refund_user.ts file, we'll then add the following code to put our action into a loading state and to loop over our charges, refund each one using the refundCharge function, and use the completeOne method to advance our progress indicator:
import { Action, io, ctx } from "@interval/sdk";
import { getCharges, refundCharge } from "./payments";

export default new Action(async () => {
  const customerEmail = await io.input.email(
    "Email of the customer to refund:"
  );

  console.log("Email:", customerEmail);

  const charges = await getCharges(customerEmail);

  const chargesToRefund = await io.select.table(
    "Select one or more charges to refund",
    {
      data: charges,
    }
  );

  await ctx.loading.start({
    title: "Refunding charges",
    // Because we specified `itemsInQueue`, Interval will render a progress bar versus an indeterminate loading indicator.
    itemsInQueue: chargesToRefund.length,
  });

  for (const charge of chargesToRefund) {
    await refundCharge(charge.id);
    await ctx.loading.completeOne();
  }

  // Values returned from actions are automatically stored with Interval transaction logs
  return { chargesRefunded: chargesToRefund.length };
});
In our refund_user.ts file, we'll then add the following code to put our action into a loading state and to loop over our charges, refund each one using the refundCharge function, and use the completeOne method to advance our progress indicator:
const { Action, io, ctx } = require("@interval/sdk");
const { getCharges, refundCharge } = require("./payments");

module.exports = new Action(async () => {
  const customerEmail = await io.input.email(
    "Email of the customer to refund:"
  );
  console.log("Email:", customerEmail);

  const charges = await getCharges(customerEmail);

  const chargesToRefund = await io.select.table(
    "Select one or more charges to refund",
    {
      data: charges,
    }
  );

  await ctx.loading.start({
    title: "Refunding charges",
    // Because we specified `itemsInQueue`, Interval will render a progress bar versus an indeterminate loading indicator.
    itemsInQueue: chargesToRefund.length,
  });

  for (const charge of chargesToRefund) {
    await refundCharge(charge.id);
    await ctx.loading.completeOne();
  }

  // Values returned from actions are automatically stored with Interval transaction logs
  return { chargesRefunded: chargesToRefund.length };
});
In Interval, a transaction is created every time an action is called. The values returned from an action are stored alongside the record of the transaction. Now, every time our action is run, we'll have a record of how many charges were refunded.
✅ Recap
In Part 1, we built a fully functional refund app in under 100 lines of code across our payments.ts and index.ts files.
In Part 1, we built a fully functional refund app in under 100 lines of code across our payments.ts and index.ts files.
- Calling
.listen()on an instance of the Interval class sets up a persistent connection between your app and Interval. - Your code is run on your infrastructure.
- You can use any shared functions, 3rd-party Node modules, etc. from inside your Interval action handlers.
- I/O methods are used to collect input and display output to people running your actions.
- The ctx object contains other data and methods (like our loading APIs) for use within an action.
- Values you return from action handlers are stored in your transaction log.