Organizing your dashboard
- TypeScript
- JavaScript
info
The Pages API is available on SDK versions v0.35.0 and higher.
Creating a page
By default all the Interval actions you create will live at the top-level in your dashboard. We provide ways to filter and search for the tool you're looking for, but you'll probably want to create pages to better organize your actions however you see fit.
To create a page, create a subdirectory in your routes directory, and create
an index.ts file inside it.
import { Page } from "@interval/sdk";

export default new Page({
  name: "Refunds",
});
The directory name configures the URL path for the page, just as file names do with actions.
To create a page, create a subdirectory in your routes directory, and create
an index.ts file inside it.
const { Page } = require("@interval/sdk");

module.exports = new Page({
  name: "Refunds",
});
The directory name configures the URL path for the page, just as file names do with actions.
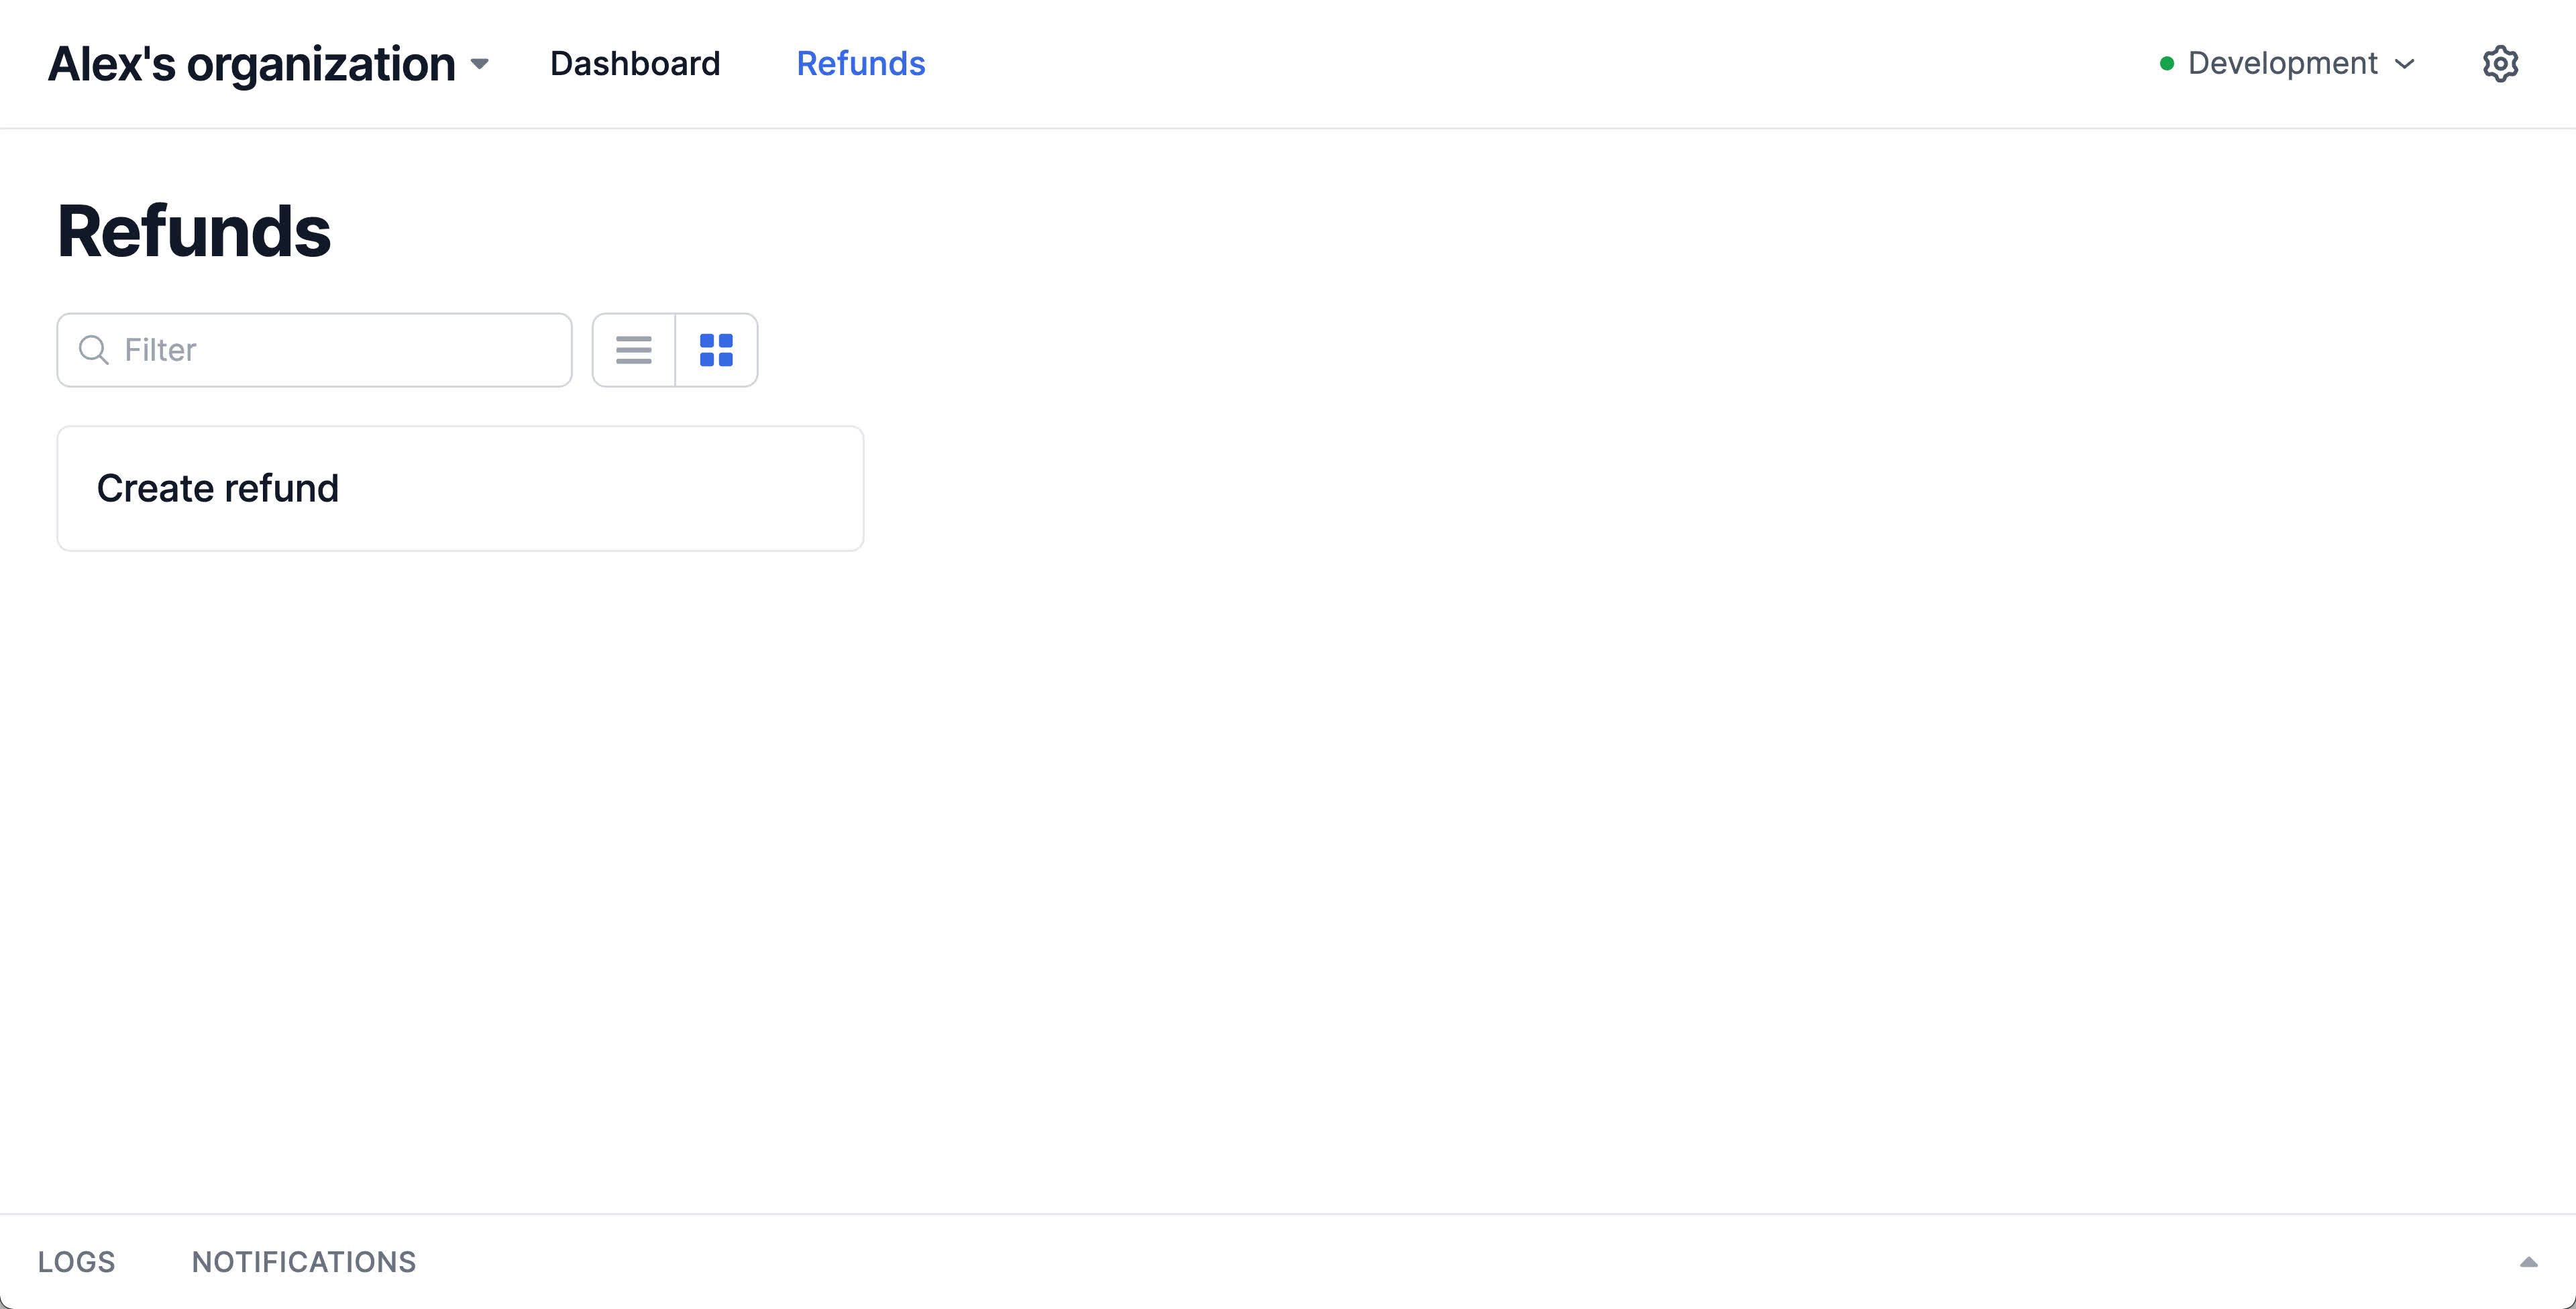
Once you've defined your page, if you revisit the Interval dashboard, you'll now see top-level navigation for reaching your page.

The new directory acts as a "sub-folder" for grouping actions. Simply move action files into the subdirectory, just as you would do at the top level. Here we'll move our refund tool to our new "Refunds" page, and also provide an explicit name for a cleaner display:
import { Action, io, ctx } from "@interval/sdk";
import { getCharges, refundCharge } from "./payments";

export default new Action({
  name: "Create refund",
  handler: async () => {
    const customerEmail = await io.input.email(
      "Email of the customer to refund:"
    );

    console.log("Email:", customerEmail);

    const charges = await getCharges(customerEmail);

    const chargesToRefund = await io.select.table(
      "Select one or more charges to refund",
      {
        data: charges,
      }
    );

    await ctx.loading.start({
      title: "Refunding charges",
      // Because we specified `itemsInQueue`, Interval will render a progress bar versus an indeterminate loading indicator.
      itemsInQueue: chargesToRefund.length,
    });

    for (const charge of chargesToRefund) {
      await refundCharge(charge.id);
      await ctx.loading.completeOne();
    }

    // Values returned from actions are automatically stored with Interval transaction logs
    return { chargesRefunded: chargesToRefund.length };
  },
});
The new directory acts as a "sub-folder" for grouping actions. Simply move action files into the subdirectory, just as you would do at the top level. Here we'll move our refund tool to our new "Refunds" page, and also provide an explicit name for a cleaner display:
const { Action, io, ctx } = require("@interval/sdk");
const { getCharges, refundCharge } = require("./payments");

module.exports = new Action({
  name: "Create refund",
  handler: async () => {
    const customerEmail = await io.input.email(
      "Email of the customer to refund:"
    );

    console.log("Email:", customerEmail);

    const charges = await getCharges(customerEmail);

    const chargesToRefund = await io.select.table(
      "Select one or more charges to refund",
      {
        data: charges,
      }
    );

    await ctx.loading.start({
      title: "Refunding charges",
      // Because we specified `itemsInQueue`, Interval will render a progress bar versus an indeterminate loading indicator.
      itemsInQueue: chargesToRefund.length,
    });

    for (const charge of chargesToRefund) {
      await refundCharge(charge.id);
      await ctx.loading.completeOne();
    }

    // Values returned from actions are automatically stored with Interval transaction logs
    return { chargesRefunded: chargesToRefund.length };
  },
});
You can repeat this process to add as many pages as you like to your dashboard, grouping related tools and information together on separate pages to help organize your dashboard and make it easier to navigate. Pages can also be nested arbitrarily!
Rendering content
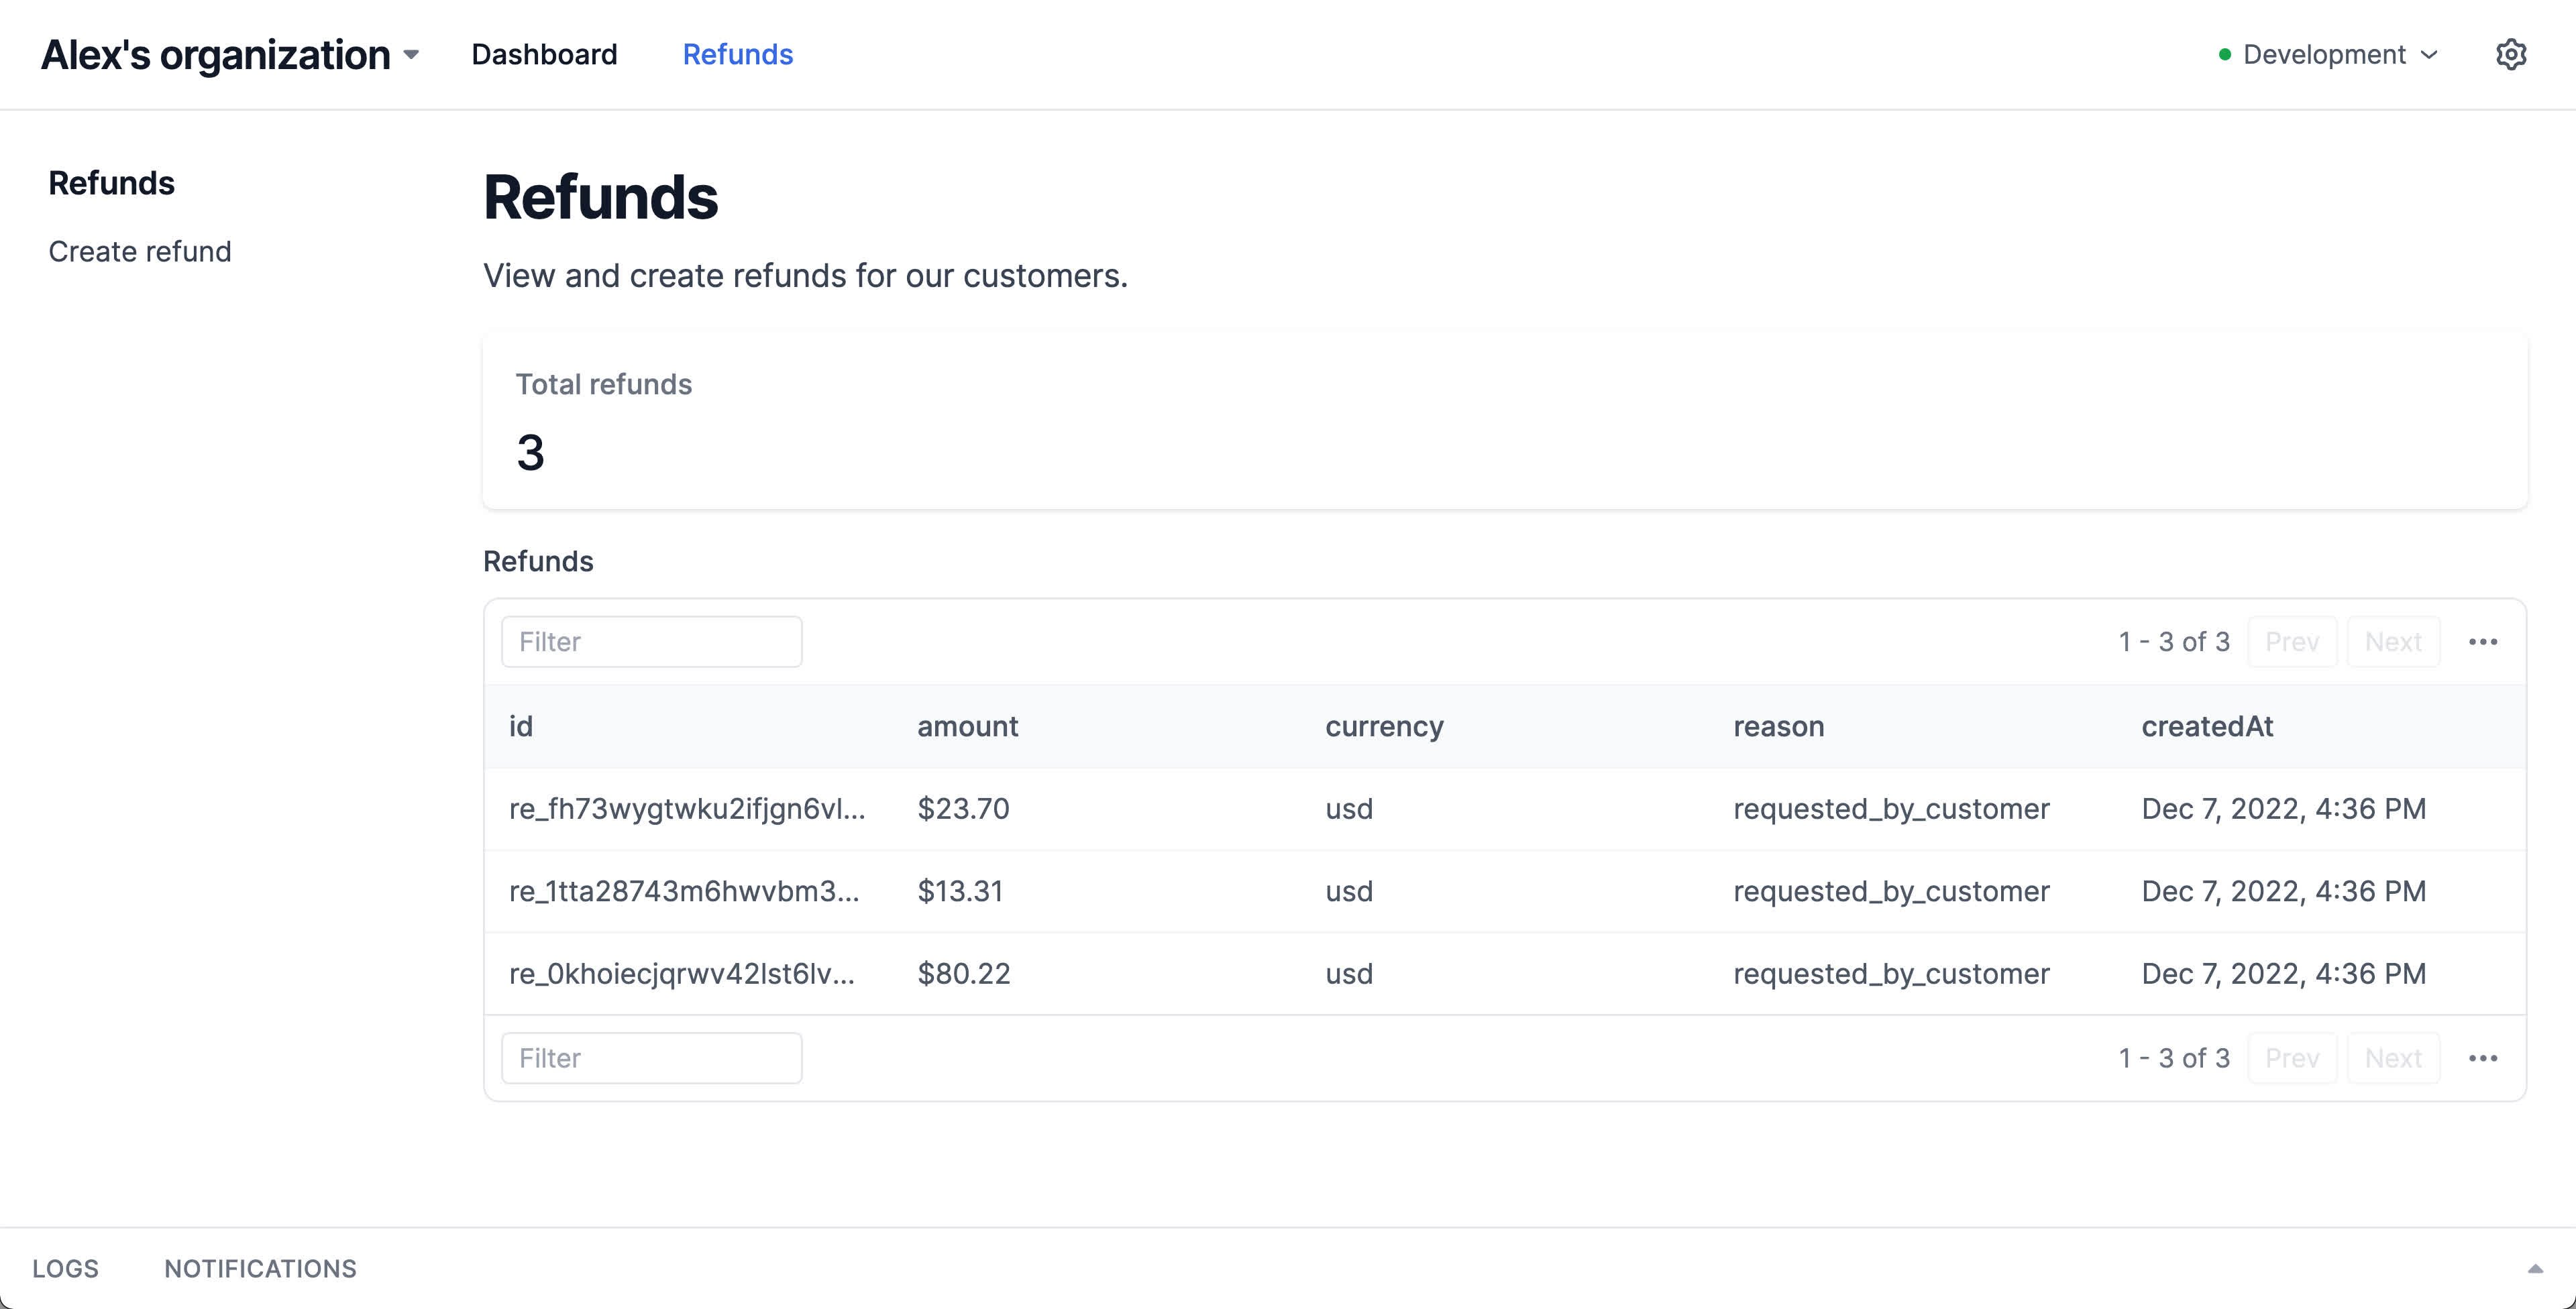
Currently our page simply acts as a sub-folder for grouping actions. You can also add content to each page to provide more information and context for the tools and data on that page. This could include text descriptions, metadata cards, tables, images, code snippets, and any other content supported via Interval display I/O methods.
We'll flesh out our new page with a description, stats on the number of recent refunds, and a table listing the refunds we've made.
To accomplish this, we'll define a handler function when instantiating the Page class. This function should load any required data and return a Layout class that defines the content of the page.
import { Page, Layout, io, ctx } from "@interval/sdk";
import { getRefunds } from "./payments";

export default new Page({
  name: "Refunds",
  handler: async () => {
    const refunds = await getRefunds();

    return new Layout({
      title: "Refunds",
      description: "View and create refunds for our customers.",
      children: [
        io.display.metadata("", {
          layout: "card",
          data: [
            {
              label: "Total refunds",
              value: refunds.length,
            },
          ],
        }),
        io.display.table("Refunds", {
          data: refunds,
        }),
      ],
    });
  },
});
To accomplish this, we'll define a handler function when instantiating the Page class. This function should load any required data and return a Layout class that defines the content of the page.
const { Page, Layout, io, ctx } = require("@interval/sdk");
const { getRefunds } = require("./payments");

module.exports = new Page({
  name: "Refunds",
  handler: async () => {
    const refunds = await getRefunds();

    return new Layout({
      title: "Refunds",
      description: "View and create refunds for our customers.",
      children: [
        io.display.metadata("", {
          layout: "card",
          data: [
            {
              label: "Total refunds",
              value: refunds.length,
            },
          ],
        }),
        io.display.table("Refunds", {
          data: refunds,
        }),
      ],
    });
  },
});
Adding menu items
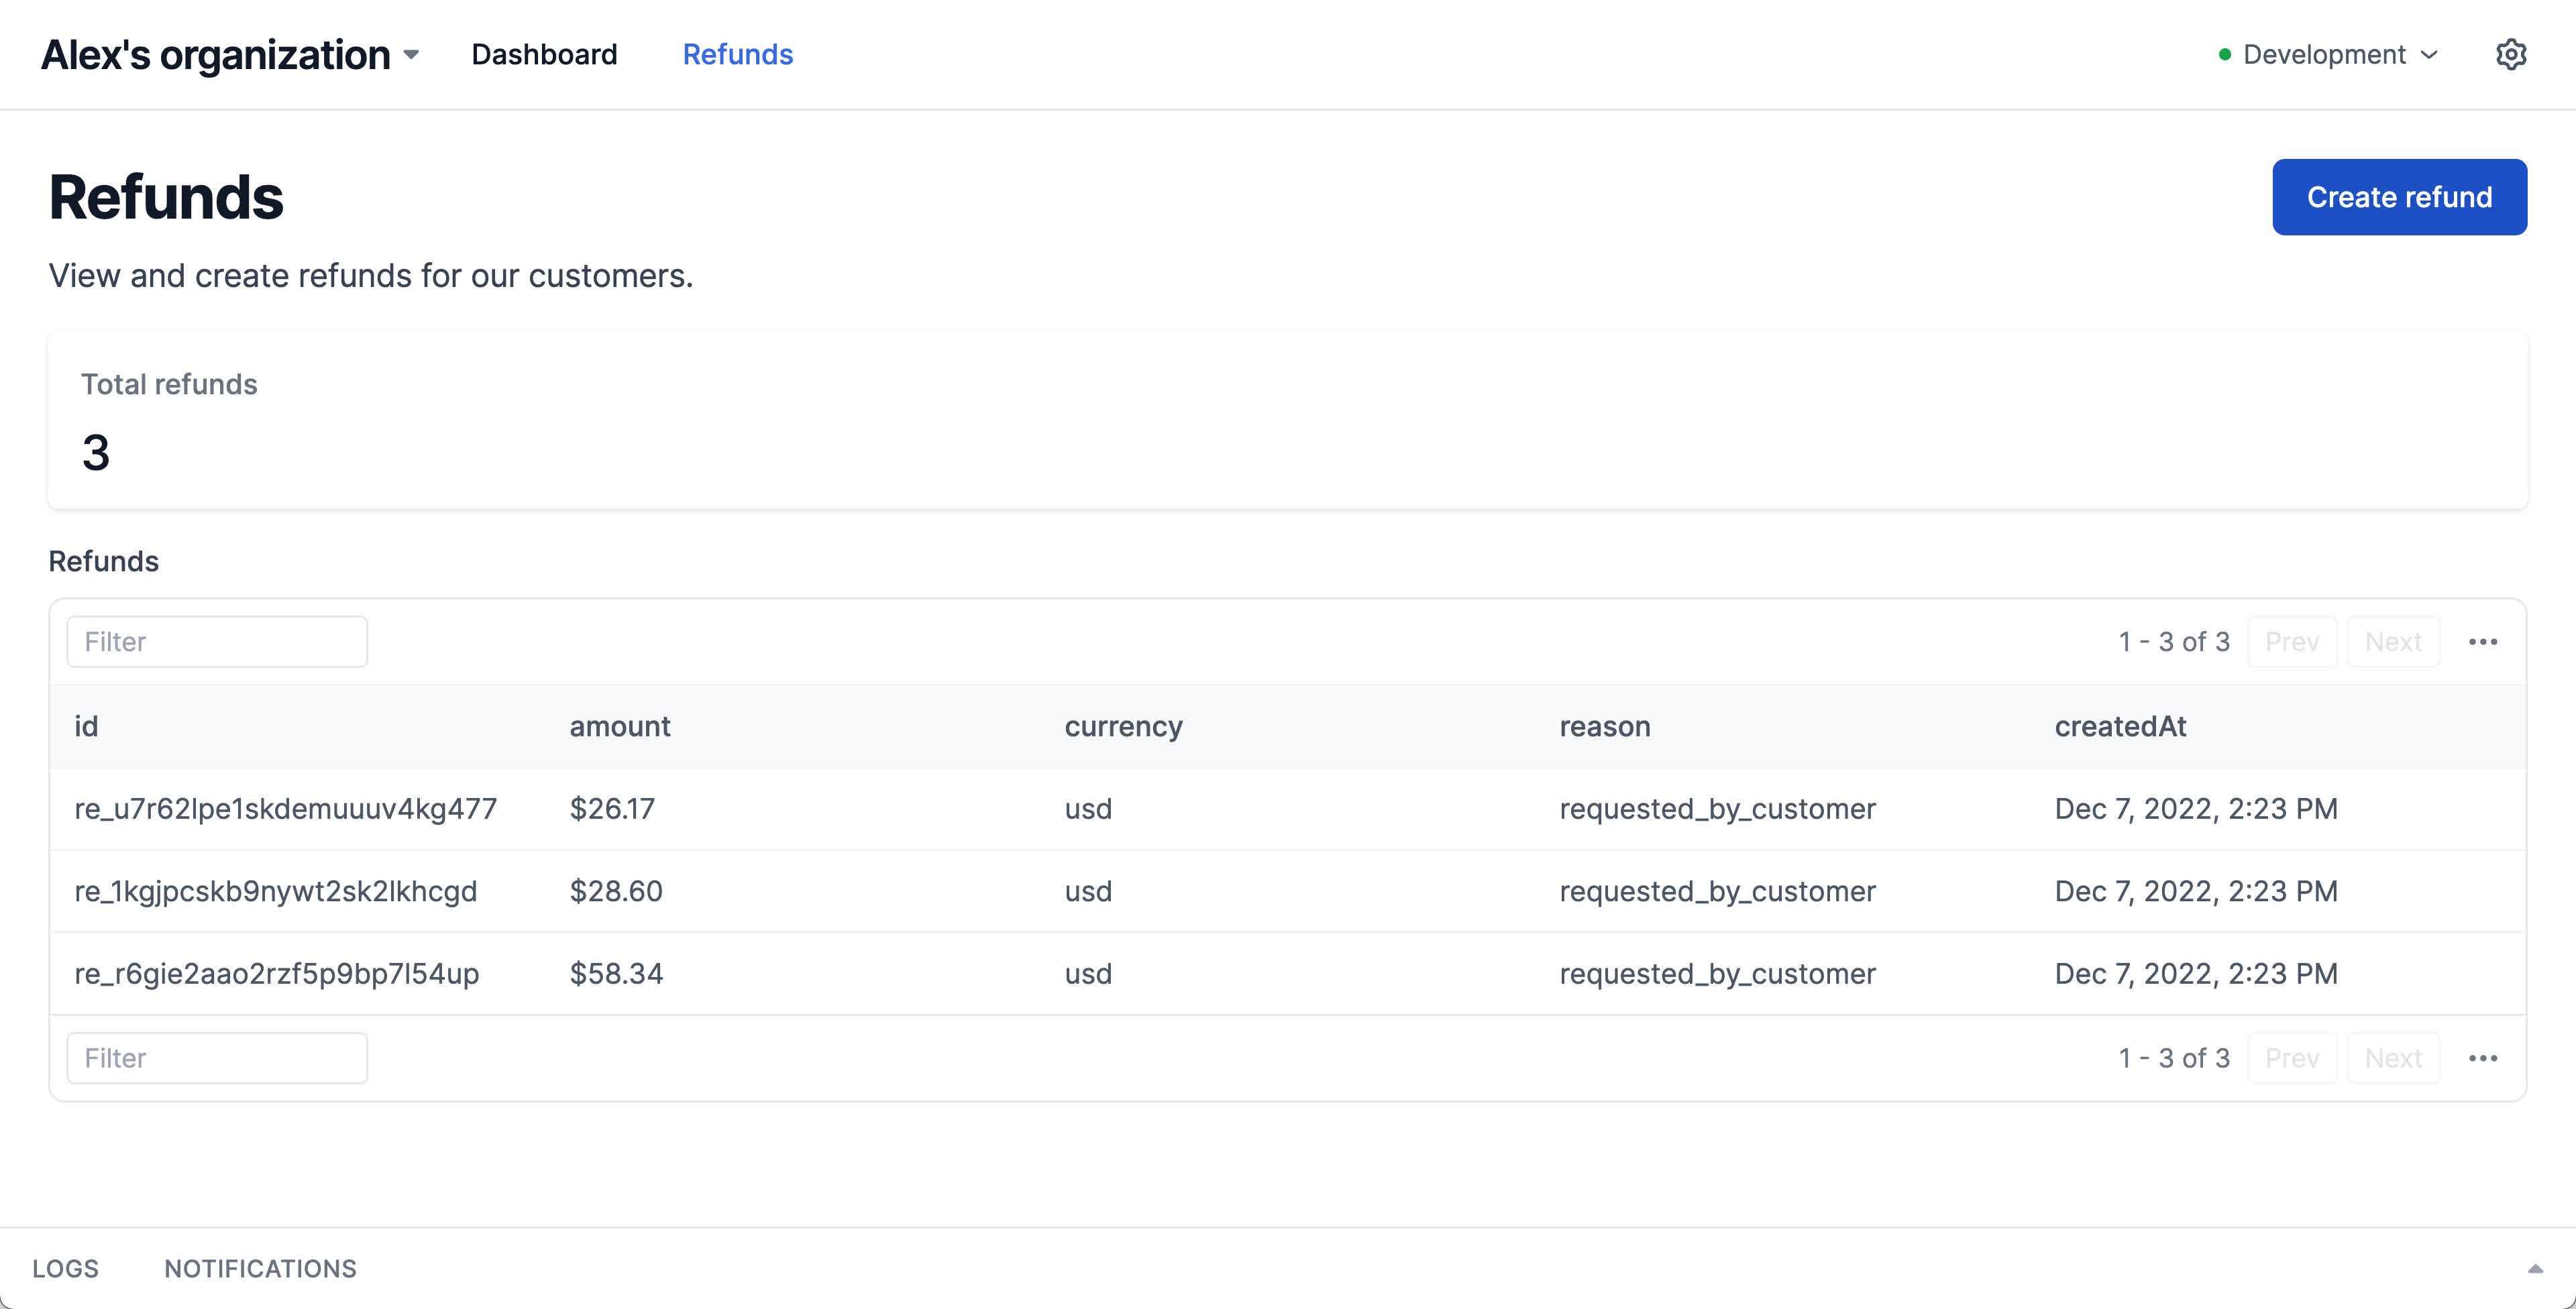
While actions nested within a page provide organizational structure within your dashboard, you can also customize the UI of pages to provide quick access to useful actions via the menuItems property.
menuItems add easy-to-access buttons at the top of any page that can link to any actions within your Interval dashboard or to external sites (menuItems elements have the same signature as Interval links).
import { Page, Layout, io, ctx } from "@interval/sdk";
import { getRefunds } from "./payments";

export default new Page({
  name: "Refunds",
  handler: async () => {
    const refunds = await getRefunds();

    return new Layout({
      title: "Refunds",
      description: "View and create refunds for our customers.",
      menuItems: [
        {
          label: "Create refund",
          route: "refunds/refund_user",
        },
      ],
      children: [
        io.display.metadata("", {
          layout: "card",
          data: [
            {
              label: "Total refunds",
              value: refunds.length,
            },
          ],
        }),
        io.display.table("Refunds", {
          data: refunds,
        }),
      ],
    });
  },
});
For actions that are set as menu items, you can avoid showing a duplicate link in the page sidebar by setting the unlisted property on the action definition.
import { Action, io, ctx } from "@interval/sdk";
import { getCharges, refundCharge } from "./payments";

export default new Action({
  name: "Create refund",
  unlisted: true,
  handler: async () => {
    const customerEmail = await io.input.email(
      "Email of the customer to refund:"
    );

    console.log("Email:", customerEmail);

    const charges = await getCharges(customerEmail);

    const chargesToRefund = await io.select.table(
      "Select one or more charges to refund",
      {
        data: charges,
      }
    );

    await ctx.loading.start({
      title: "Refunding charges",
      // Because we specified `itemsInQueue`, Interval will render a progress bar versus an indeterminate loading indicator.
      itemsInQueue: chargesToRefund.length,
    });

    for (const charge of chargesToRefund) {
      await refundCharge(charge.id);
      await ctx.loading.completeOne();
    }

    // Values returned from actions are automatically stored with Interval transaction logs
    return { chargesRefunded: chargesToRefund.length };
  },
});
While actions nested within a page provide organizational structure within your dashboard, you can also customize the UI of pages to provide quick access to useful actions via the menuItems property.
menuItems add easy-to-access buttons at the top of any page that can link to any actions within your Interval dashboard or to external sites (menuItems elements have the same signature as Interval links).
const { Page, Layout, io, ctx } = require("@interval/sdk");
const { getRefunds } = require("./payments");

module.exports = new Page({
  name: "Refunds",
  handler: async () => {
    const refunds = await getRefunds();

    return new Layout({
      title: "Refunds",
      description: "View and create refunds for our customers.",
      menuItems: [
        {
          label: "Create refund",
          route: "refunds/refund_user",
        },
      ],
      children: [
        io.display.metadata("", {
          layout: "card",
          data: [
            {
              label: "Total refunds",
              value: refunds.length,
            },
          ],
        }),
        io.display.table("Refunds", {
          data: refunds,
        }),
      ],
    });
  },
});
For actions that are set as menu items, you can avoid showing a duplicate link in the page sidebar by setting the unlisted property on the action definition.
const { Action, io, ctx } = require("@interval/sdk");
const { getCharges, refundCharge } = require("./payments");

module.exports = new Action({
  name: "Create refund",
  unlisted: true,
  handler: async () => {
    const customerEmail = await io.input.email(
      "Email of the customer to refund:"
    );

    console.log("Email:", customerEmail);

    const charges = await getCharges(customerEmail);

    const chargesToRefund = await io.select.table(
      "Select one or more charges to refund",
      {
        data: charges,
      }
    );

    await ctx.loading.start({
      title: "Refunding charges",
      // Because we specified `itemsInQueue`, Interval will render a progress bar versus an indeterminate loading indicator.
      itemsInQueue: chargesToRefund.length,
    });

    for (const charge of chargesToRefund) {
      await refundCharge(charge.id);
      await ctx.loading.completeOne();
    }

    // Values returned from actions are automatically stored with Interval transaction logs
    return { chargesRefunded: chargesToRefund.length };
  },
});
✅ Recap
In Part 2, we extended our Interval dashboard by creating our first page to group actions and render additional content.
- Pages can be created by instantiating the
Pageclass alongside actions. - To render content on a page, define the
handlerfunction and utilize I/Odisplaymethods. - Actions can be nested beneath pages in the route hierarchy and linked to via
menuItems.
- Pages can be created by instantiating the
Pageclass alongside actions. - To render content on a page, define the
handlerfunction and utilize I/Odisplaymethods. - Actions can be nested beneath pages in the route hierarchy and linked to via
menuItems.